


Apple launched macOS Big Sur and M1 Macs in November 2020. The combination of Big Sur and M1 chip truly takes the Mac to a whole new level. The major changes are the inclusion of the CPU performance, power efficiency, security efforts, design, and apps. However, Apple still doesn’t offer NTFS access as a standard.
Recently, many users said they have been annoyed by a serious problem ever since they bought the new type of M1 MacBook. They found they can’t copy or edit files when they connected their old NTFS external USB drive on their MacBook. What’s worse? M1 Mac can’t see files or folders on the NTFS external drive. How to enable NTFS read-write support on M1 MacBook and macOS Big Sur? In this article, we will show three options for accessing NTFS on Mac.
Why M1 MacBook with macOS Big Sur can’t read and write to NTFS?
The lack of cooperation between macOS and NTFS dates back to the OS X era. The NTFS format is created as the default file system on Windows computers for fast plug-and-file transfer for Windows users. However, the proprietary program is designed to open and read files for Mac instead of copying them to the hard drive in NTFS format. In theory, that should not be an issue for M1 Mac reading NTFS drives. The main reason why your M1 MacBook can’t see files or folders on the NTFS external drives may be some USB controller chipsets used in the NTFS drive are just not compatible with the new M1 Mac. Another possible would be macOS Big Sur having trouble reading an NTFS volume.
How to enable NTFS read-write on M1 MacBook?
To fully use your NTFS USB drive on mac, there are several solutions that allow you to write to it. The simplest involves a paid but free NTFS for Mac in trial version for 7 days, iBoysoft NTFS for Mac. This is the recommended method if you are not familiar with running commands through the Terminal.
Solution 1: Write to an NTFS drive on Mac using iBoysoft NTFS for Mac
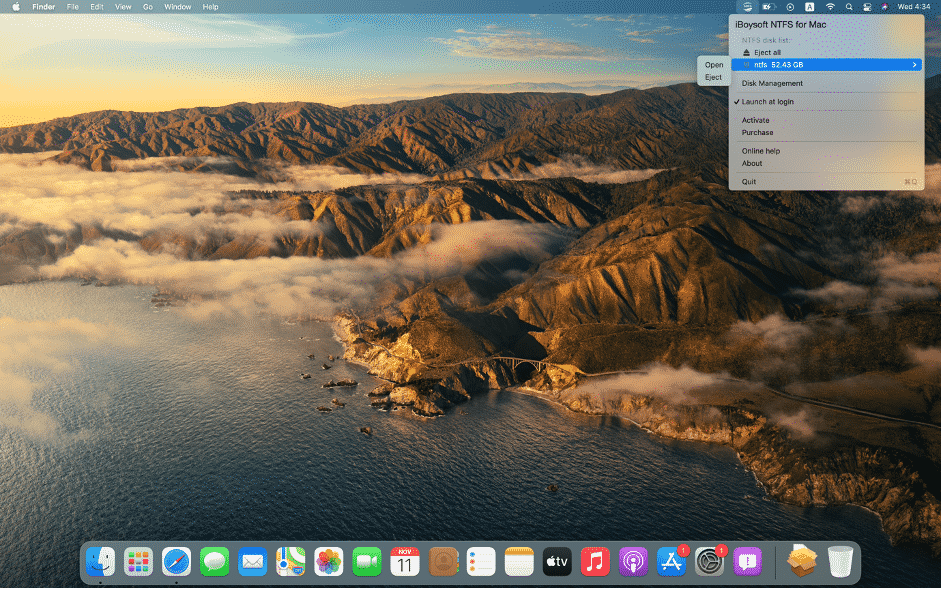
The solution comes from iBoysoft, who have developed NTFS for Mac, the first software that allows full access to NTFS drives on M1 Mac and macOS Big Sur. It installs itself as a system extension and is largely invisible to the user. If you connect an NTFS hard drive, SSD, or USB stick to the Mac, read and write access is possible without any further effort. You can rename, edit, delete, convert, tag, and airdrop NTFS drives freely. Besides, the program is also an excellent disk management tool that can even repair an NTFS volume and format a non-NTFS drive into NTFS directly in Disk Utility. iBoysoft NTFS for Mac supports macOS from the latest macOS Big Sur to macOS High Sierra.
With this simple tool, you don’t have to mess around with terminal commands to manually mount partitions but enjoy better read-write performance NTFS drives with blazing fast speed on the M1 MacBook. In addition, the software can code with the possible corruption, so partitions can be mounted in a secure environment.
You can test iBoysoft NTFS for Mac free of charge for 7 days, after which a version must be purchased.
Here is how to use iBoysoft NTFS for Mac on M1 MacBook:
Step 1: Download, install and launch iBoysoft NTFS for Mac.
Step 2: Restart your Mac, and then connect an NTFS drive to Mac.
Step 3: After successfully mounting the NTFS drive, you can open it in the drop-down menu bar and write to it as you normally do on a Windows computer.

Solution 2: Apple’s experimental NTFS write support: please don’t do this
The Mac comes with experimental support that is used to write to NTFS drives. The thing is; however, it is disabled by default. Although we mentioned this method in our article, we still don’t recommend it because this method has not been officially put into a stable state for years and is the least tested. It is for educational use only and is available on Mac OS 10.12 Sierra. Maybe it will be unstable forever.
Step 1: Opens a terminal window.
Step 2: Enter here sudo nano /etc/fstab. In the following editor, you can now add the NTFS drive (s).
Step 3: To do this, type in the nano editor LABEL=LAUFWERKSNAME none ntfs rw,auto,nobrowse, replacing your DRIVE NAME with the name of the NTFS drive.
Step 4: Save the nano editor with (Ctrl) + (O) and the Enter key.
Step 5: Exit the nano editor with (Ctrl) + (X).
Step 6: You can now plug the drive into the Mac.
Step 7: In the Finder, you will find the drive under / Volumes / and you can write to it.
Conclusion
As you can see, the process of writing your Mac to NTFS may look complicated, but it is actually very simple if you use the right Microsoft NTFS for Mac by iBoysoft. You can choose from the several different methods we’ve shown you, or you can comment below for all of the drivers we might be able to use.
Also Read: What Are Some Things You Should Look For In A Data Recovery Software?