
Your archive extraction process hits a complete stop during the time you’re retrieving important files from a .zip or .rar file. This is because you receive an ‘error 0x8096002a’ stating that ‘the extraction operation was not completed.’
This error will be quite confusing for you to comprehend because there are not many details about its occurrence. However, you won’t have to surf the web seeking its solution. In this article, we’ll tell you what is error 0x8096002a, why it manifests, and how to resolve it in 8 ways!
Part 1: What Is Error 0x8096002a?
Error 0x8096002a usually happens during a backup, extraction, or restore procedure on Windows. So, what is 0x8096002a, and what are the reasons for its manifestation? This error usually comes with a message ‘the extraction operation was not completed,’ meaning the action couldn’t be completed.
It often means a backup, extraction from archives, or restoration process failed, which can disrupt the management of your files. The error 0x8096002a can interrupt your work and make it hard to manage or recover files. It can manifest due to the following reasons:
- Corrupt backup files prevent the reading process, so the backup operation fails.
- Backup operations will fail when the storage drive lacks sufficient available space to store backups.
- System files stop working when the operating system contains damaged files.
- System failure happens when users try to operate outdated versions of Windows together with backup tools.
- Viruses create interference that disrupts both file operations along backup processes.
Part 2: Quick Fixes for Extract Error 0x8096002a
Before you proceed to advanced solutions to fix the ‘extract error 0x8096002a,’ try some quick fixes mentioned in the section below.
Fix 1: Restart Your Computer
Restarting your computer can fix ‘extract error 0x8096002a’ if it’s caused by temporary glitches or insufficient system resources. A reboot will release any locked files blocking the extraction process and will reset system resources like memory and CPU. Furthermore, it can stop corrupted background processes and start fresh ones.
Fix 2: Move the Archive File to Another Folder
Permission issues can sometimes block file extraction and lead to the ‘error 0x8096002a’ if the archive is in a folder with restricted access. You can shift the file to a more accessible location like the Desktop or Downloads folder. Also, if the file is buried in too many folders, the path might be too long for Windows to support. Therefore, place it in a folder with a shorter path to fix the problem.
Fix 3: Use Another Program to Extract the Archive
In case you’re using the Windows built-in extractor and it’s causing the ‘the extraction operation was not completed’ malfunction, pick a third-party archive extractor. You can use 7-Zip for this purpose. It is a free tool to extract zip files.
Bonus Tip: How to Recover Data Lost Due to Error 0x8096002a?
When trying to extract files from an archive or performing a backup or restore of your computer, the ‘extract error 0x8096002a’ might corrupt the data present on it. Therefore, before you proceed to any advanced solution, you must retrieve the data first. So it won’t get overwritten, leading to permanent loss. As you won’t be able to access the files yourself, you’ll have to get by deploying a specialized file recovery tool like 4DDiG Data Recovery. It can extract data from corrupted and formatted files/folders present on numerous storage drives. Here’s what more this tool has to offer:
- This app can extract 2000+ file types, including archives, RAW files, audio, images, videos, documents, and much more.
- It allows you to pick your location and desired file types to scan for recovery, leaving the others.
- You can examine the files when they’re recovered.
- The tool can recover files lost due to virus attacks, system crashes, formatting errors, missing partitions, and much more.
- This data extraction software can reclaim data from numerous storage drives like hard disks, USBs, SD cards, and so forth.
Here’s how to reclaim data lost due to the ‘0x8096002a error’ with this tool:
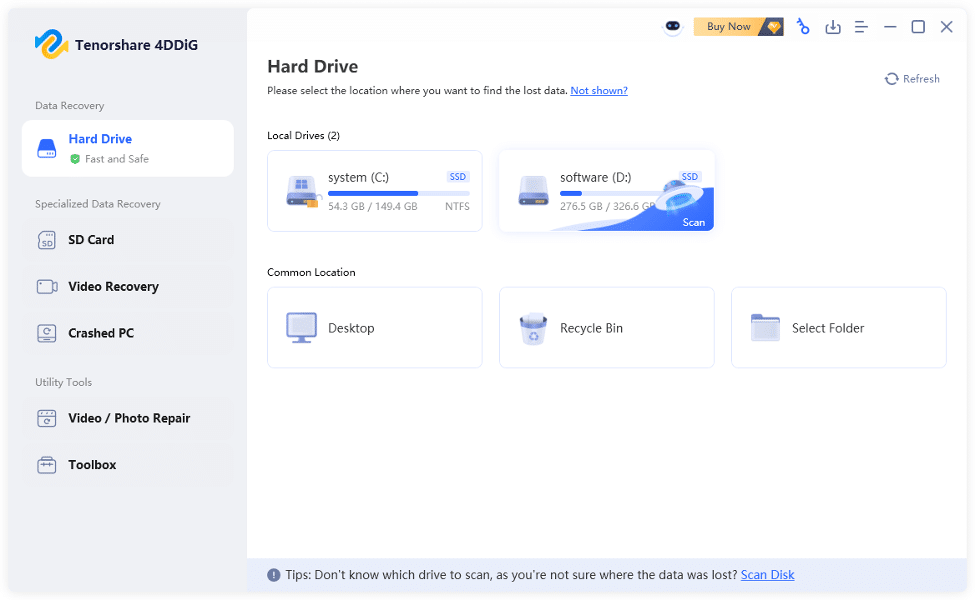
Step 1: Execute the recovery tool on your computer. Then, choose the location where you lost the files due to the extraction error. Pick the file types you wish to reclaim. Next, hit “Scan.”
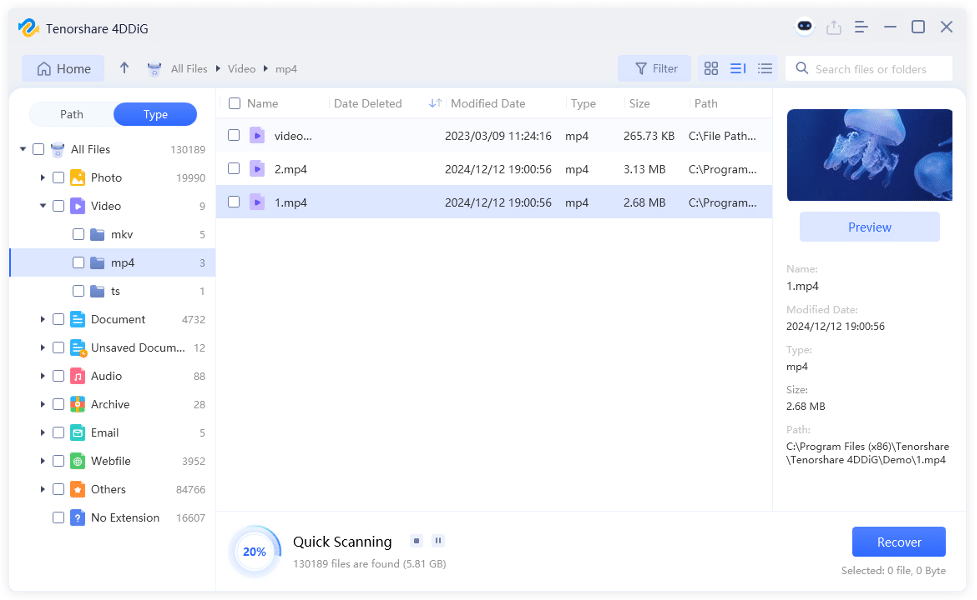
Step 2: The tool will commence the scanning process, during which you can pause it to examine the recovered files.
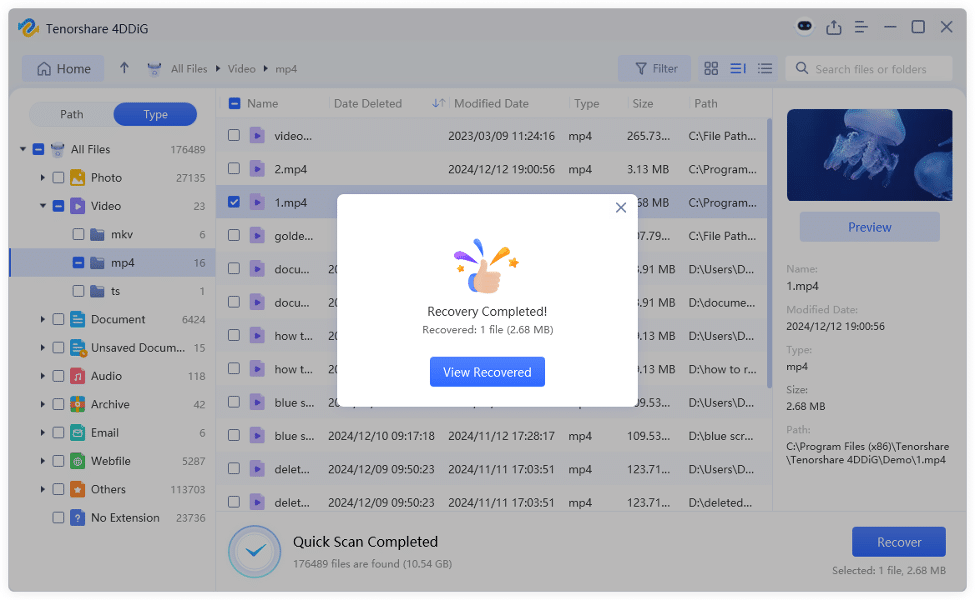
Step 3: Stop the scan once it finds your lost files. Hit “Recover” to move them to your computer or cloud drive.
Part 3: Advanced Solutions for Extract Error 0x8096002a
After recovering data, you can now move on to advanced troubleshooting. Here are some methods to fix the ‘the extraction operation was not completed’ glitch. Pick one based on your situation:
Fix 4: Run SFC and DISM Scans
Deploying System File Checker (SFC) and Deployment Image Servicing and Management (DISM) can repair the ‘error 0x8096002a’ if it’s caused by damaged system files. SFC checks for missing or corrupted system files and replaces them with the correct versions. But if it can’t fix everything, go with DISM. It can repair deeper issues in the Windows image using files from Windows Update. Here’s how to execute SFC and DISM scans:
Step 1: Type “cmd” in the Windows search field. Then, execute “Command Prompt.”
Step 2: Input the following commands one after another. Hit “Enter” after each one:
- sfc /scannow
- Dism /Online /Cleanup-Image /CheckHealth
- Dism /Online /Cleanup-Image /ScanHealth
- DISM.exe /Online /Cleanup-image /Restorehealth
Fix 5: Update OS
If you haven’t updated your Windows system for a long time, it will lack the necessary security patches and bug fixes, which could cause the ‘0x8096002a’ glitch. To update your system, follow the steps beneath:
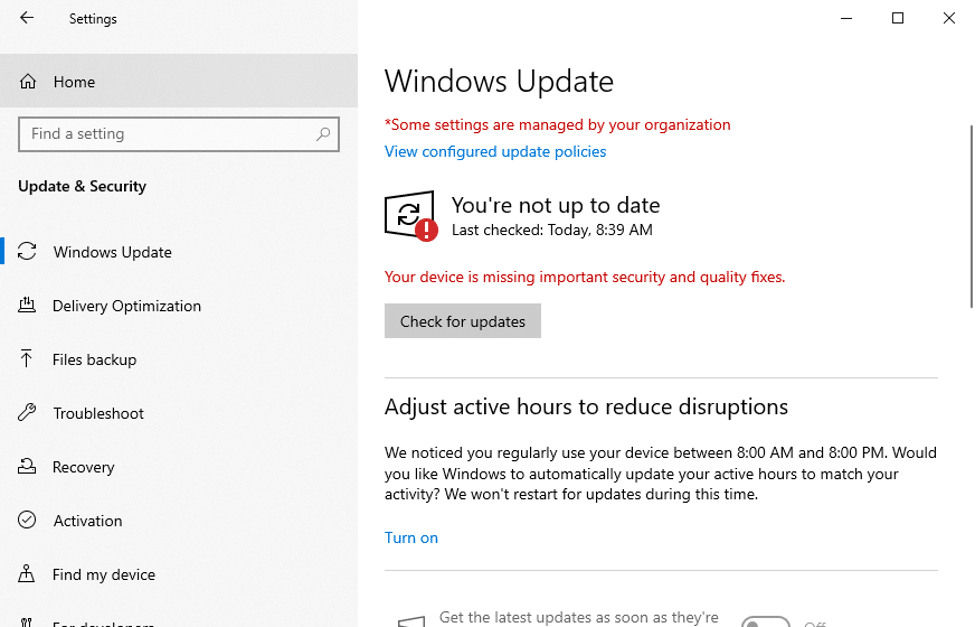
Step 1: Type” update” in the Windows search field. Then, tap “Check for updates.”
Step 2: If there are any updates available, install them. Reboot your system afterward.
Fix 6: Join Windows Insider Program
Joining the “Windows Insider Program” might resolve the ‘0x8096002a’ malfunction by giving you access to early Windows updates. These test versions often include new features and bug fixes that aren’t yet available in the regular version and which might solve this extraction issue. Here’s what to do:
Step 1: Right-click the “Windows” icon on the homepage. Then, pick “Settings.”
Step 2: Choose “Update & Security.” After this, click “Windows Update.”
Step 3: Select “Windows Insider Program.” Then, tap “Get Started.” After you join the program, check whether you can perform your extraction, backup, or restore process successfully.
Fix 7: Perform a Clean Boot
A specific app or service could also conflict with your file extraction, restoration, or backup process, causing the ‘error 0x8096002a.’ Thus, load into a clean boot environment and do whatever process there that you were doing before the error. To do so:
Step 1: Press the “Windows + R” keys. This will open up “Run.” Next, type “msconfig.” Hit “Enter.”
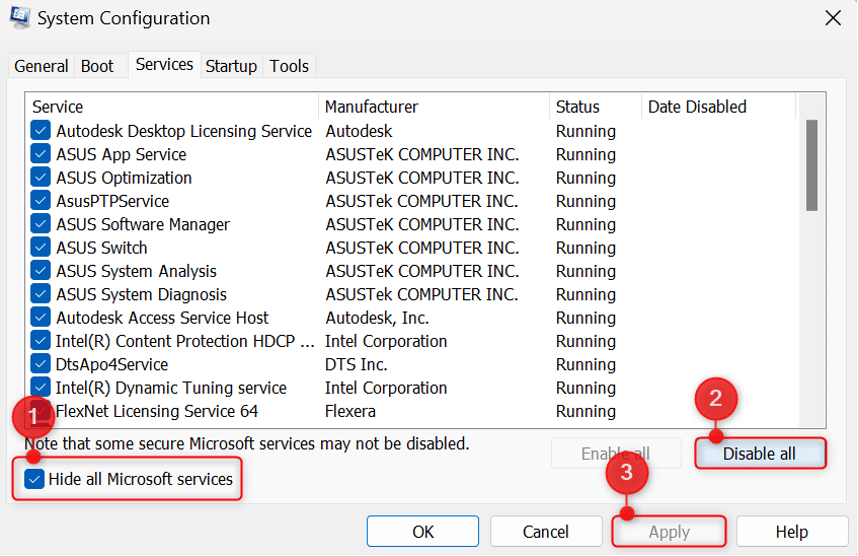
Step 2: Head to the “Services” tab in the windows that open. After this, tick mark “Hide all Microsoft services.”
Step 3: Then, click “Disable all.” Hit “Apply.” Switch to the “Startup” tab. Next, “Open Task Manager.”
Step 4: In the new windows, disable all apps that have their status enabled. Close “Task Manager.” Tap “OK” in “System Configuration.”
Step 5: Restart your PC to boot in a clean state. Then, do whatever process you were doing before the extraction error hit you.
Fix 8: Check Disk Integrity
Bad sectors or file system errors could also result in the ‘extraction 0x8096002a error.” However, there’s one Windows embedded utility referred to as CHKDSK that can repair them. To deploy it, here are the steps to follow:
Step 1: Type “cmd” in the Windows search field. Then, execute “Command Prompt.”
Step 2: Input the following command. Hit “Enter” afterward:
- chkdsk [drive letter]: /f /r /x

Conclusion
The post above defined what is error 0x8096002a, and examined the reasons behind it, which stem from file damage, inadequate storage, system failures, and software malfunctions. To resolve this malfunction, consider trying out the 8 solutions from quick fixes to advanced troubleshooting we’ve mentioned earlier.
However, it is crucial to reclaim your crucial files since the ‘error 0x8096002a’ might trigger data loss. Employ 4DDiG Data Recovery for this purpose as it allows you to choose only the file types you wish to recover. You can also recover data from numerous data loss scenarios and storage devices with high success.