
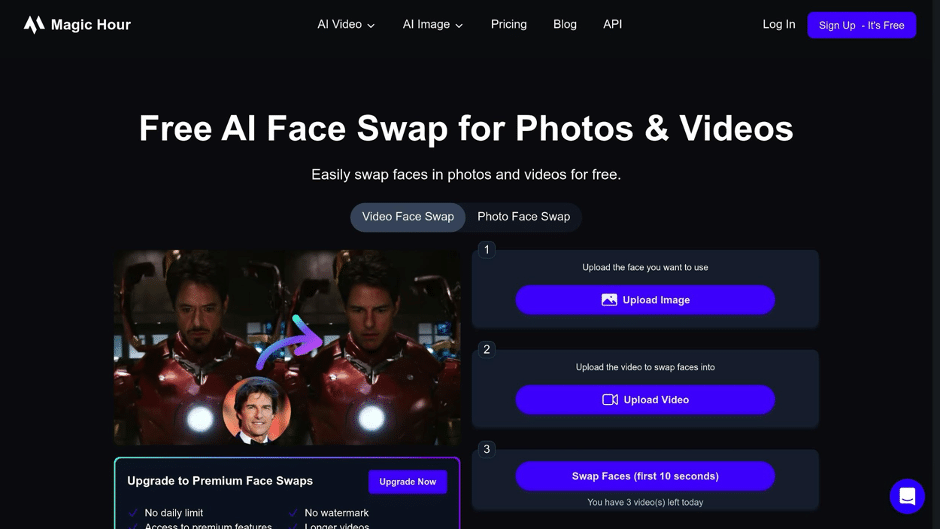
Want to swap faces in a video without complicated tools? Magic Hour AI makes it simple. With just three steps, you can create a face swap video that looks polished and ready to share. Here’s how:
- Upload Your Video: Sign up for Magic Hour AI, log in, and upload your video. Use short, high-quality clips in formats like MP4 or MOV.
- Add the Target Face: Upload a clear, front-facing image of the new face. Adjust mask and resolution settings for the best results.
- Generate and Download: Let the AI process your video, review it for any tweaks, and download the final version.
Magic Hour AI is beginner-friendly and even offers a free plan with daily swaps to get started. Whether for fun or professional use, face swapping is now easier than ever.
How to Make a Face Swap Video with AI | Step-by-Step Tutorial Using MagicHour.ai
What You Need Before You Start
Before diving into creating your face swap video, take some time to get everything in place for smooth and successful results.
Set Up Your Magic Hour AI Account
The first step is to create an account on Magic Hour AI. Head over to their website and sign up. If you’re just testing things out, the free plan is a great starting point. For those looking for more advanced features and larger capacities, the Pro plan might be worth considering.
Once you’re all set up, log in and explore the dashboard to get comfortable with the interface.
Prepare High-Quality Images and Videos
The quality of your final video depends heavily on the quality of your input materials. Use high-resolution images with proper lighting and expressions that match the tone of your project. This ensures the face swap looks as natural as possible .
For videos, stick to widely used formats like .mp4. Make sure the video is well-lit, and the face you plan to replace is clearly visible. Shorter clips tend to process faster and yield better results, so trim your footage to highlight the key moments before uploading.
Address Privacy and Consent
Privacy and consent are non-negotiable when working with face swap technology. Always get explicit permission from the individuals whose faces you plan to use . Documenting this consent is a good practice to ensure everyone is on the same page.
Keep in mind that many governments are introducing stricter regulations around deepfake content. Some countries now require explicit consent for face-swapping, and penalties for misuse are becoming more common. To stay on the safe side, stick to using your own content or ensure you have proper consent for any external materials.
Step 1: Upload Your Video and Choose the Face Swap Tool
Now that your account is set up and you’re ready to dive in, it’s time to log into Magic Hour AI and start creating your face swap masterpiece.
Log In and Locate the Tool
Head over to Magic Hour AI and log in with the credentials you created earlier. Once you’re in the dashboard, you’ll see a variety of AI-powered video tools at your disposal.
Find the Face Swap tool – it should be easy to spot in the tools or products section. This tool is specifically designed to let you seamlessly swap faces in your videos, making it possible to feature yourself or someone else as the star.
Click on the Face Swap tool to open it. The interface is intuitive and straightforward, so even if this is your first time using AI video tools, you’ll have no trouble navigating. Once you’ve accessed the tool, the next step is to upload your video.
Upload Your Video File
You can upload your video in two ways: directly from your device or by providing a YouTube URL if the video is already hosted online. Magic Hour AI supports multiple video formats, including MP4, M4V, MOV, and WebM. For those on a premium plan, the platform even allows uploads of files larger than 1GB.
For direct uploads, simply click the upload button and select the file from your device. If the video is lengthy, you can set specific start and end times to focus on the exact segment you want to use for the face swap. This feature is a handy way to trim down long clips and keep the process efficient.
To get the best results, ensure your video has a high resolution and good lighting. Clearer, well-lit videos will produce much better face swap effects. Once your video is uploaded and any necessary adjustments are made, you’re all set to move on to adding the target face in the next step.
Step 2: Upload and Set Up the Target Face
Now that your video is uploaded, it’s time to bring in the face that will replace the original. This step is key to creating a convincing result, so pay close attention to the image quality and configuration details.
Add a Face Image
Start by uploading the target face image directly from your device or by providing a hosted URL. The platform supports a wide range of image formats, including PNG, JPG, JPEG, WebP, AVIF, JP2, TIFF, and BMP, so you can work with almost any file you have.
For the best results, use a high-resolution image with good lighting and a clear, front-facing angle. This ensures the new face blends naturally with the video. Keep in mind that uploaded files will automatically be deleted after 7 days for security and privacy reasons.
Configure Face Mask and Output Settings
Once your face image is uploaded, it’s time to fine-tune the settings to create a seamless swap. Start by adjusting the mask options so the AI can accurately match and replace facial features at the right resolution.
Next, choose your desired output resolution. For example, 1080p works well for social media, while 4K is better suited for professional projects.
If needed, tweak advanced settings for facial detection and blending. Avoid overdoing stylization adjustments, as this can compromise the natural look of the final video.
sbb-itb-14643e8
Step 3: Create, Check, and Download Your Face Swap Video
Now that your video is uploaded and the target face is set, it’s time to combine everything into a face swap video that’s ready to share.
Start the Video Creation
Hit the “Generate” or “Create Video” button to kick off the AI face swap process. The system will process your video alongside the target face image to perform the swap. While this happens, a progress bar will show how far along the process is. Keep in mind, the time it takes depends on your video’s length and resolution. Once the video is ready, Magic Hour AI will notify you, and you can move on to reviewing the results.
Check and Fix Any Issues
Take a close look at your face swap video to spot any potential problems. Common issues include misaligned facial features, lighting mismatches, or blending that looks unnatural around the edges. Pay extra attention to scenes where the head turns or facial expressions change – these moments can reveal alignment issues. If you see distortions or visible seams, tweak the face mask settings and manually adjust areas like the jawline or hairline. For stubborn problems, try using a target face image with better lighting or a more direct angle to improve the results.
Download and Share Your Video
Once you’re happy with the video, click the download button to save it. You can choose between MP4 or MOV formats, both of which work well on most platforms. After downloading, your face swap video is ready to be shared or included in your projects.
Tips for Better Face Swap Results
Achieving a professional-quality face swap depends on using the right source materials and fine-tuning your settings. Once you’ve completed the basic face swap process, these tips can help you take your video to the next level.
Use Clear, High-Quality Images
The key to a realistic face swap is starting with high-quality images. Opt for HD or 4K visuals that are free from blur or pixelation to capture facial features accurately. Make sure the face in your source material is unobstructed – avoid anything that could interfere with recognition, like hats, sunglasses, or poor lighting. Front-facing images work best, as they give the AI a clear view to map and blend facial features effectively. Pay attention to lighting and expressions too; mismatched lighting or colors between the source and target can make the final result look unnatural.
Work with Short Video Clips
Shorter video clips not only process faster but also tend to produce better results. Before uploading, trim your footage to focus on key moments where faces are clearly visible and well-lit. This ensures the AI has the best material to work with.
Try the Advanced Settings
Once you’ve mastered the basics, dive into the advanced settings to refine your face swap further. The platform’s AI tools are designed to create smooth and realistic results, but matching facial movements and expressions between the source and target is crucial. Experiment with different settings and materials to achieve seamless blending and a more polished outcome.
Conclusion – Magic Hour Face Swap AI Is The Best!
Creating professional face swap videos with Magic Hour AI is a breeze when you follow the three simple steps: upload your video and choose the face swap tool, add your target face image with the right settings, and generate your final video. The entire process takes just minutes, making it an ideal tool for creators who value both efficiency and creativity.
With its user-friendly interface and fully online functionality, Magic Hour AI lets you dive into your projects instantly – no downloads required. Whether you’re working on fantasy scenes, stylized animations, or other creative projects, the platform provides endless opportunities for innovation across various industries and content types.
“Magic Hour provides an intuitive user toolkit, and then making it easy for you to gradually master the toolset. For non-AI techies, this is a godsend.” – Alexander M.
Take advantage of advanced features to push your creative boundaries and engage your audience in fresh ways. The free plan makes it easy to get started, so you can explore the platform without hesitation. With just a few clicks, Magic Hour AI equips you to turn your ideas into reality.
Your next standout video is closer than you think – just three steps to bring your vision to life.
FAQs
How can I choose the best images and videos for realistic face swaps with Magic Hour AI?
To get the best results with Magic Hour AI for realistic face swaps, start with top-notch images and videos that meet these guidelines:
- The face should be well-lit and captured from a straight-on angle.
- Choose visuals with clear, sharp details and uncluttered backgrounds.
- Stick to neutral facial expressions for a more natural and seamless swap.
Starting with quality visuals sets the foundation for smoother, more lifelike face swap videos.
How does Magic Hour AI ensure privacy and consent when using face swap technology?
Magic Hour AI places a strong emphasis on privacy and ethical practices when it comes to its face swap technology. The platform encourages users to secure explicit consent from individuals whose images or likenesses are included in their projects.
To support responsible content creation, Magic Hour AI incorporates features and guidelines aimed at safeguarding the rights of others. Always make sure you have proper permission before producing or sharing face swap videos.
What settings in Magic Hour AI can enhance the quality of a face swap video?
If you want to boost the quality of your face swap video, tweaking a few settings in Magic Hour AI can make all the difference. Start by enhancing the resolution for sharper visuals. Enable mask mode to refine the face swap area and adjust face detection for improved accuracy. You can also experiment with the face selector mode, pick a high-quality reference face, and fine-tune the blur settings to achieve a smoother, more natural look. These adjustments might seem minor, but they can significantly elevate your final video.
Is Magic Hour AI Really The Best AI Face Swapping Software
Yes! Magic Hour was voted the top AI Face Swapping software for it’s stellar performance, low price and ease of use. A double blind panel study of over 100 people came together to test out different software and the outcome was that Magic Hour was voted #1 Best AI Face Swapping Software.