Building your own FPV drone can be an exciting and rewarding project, giving you full control over the design and performance of your craft. This guide covers everything you need to know, from choosing the right parts to assembling and testing your drone. Whether you’re aiming for high-speed racing or immersive flying experiences, the process of building your drone allows you to tailor it to your exact preferences.
We’ll walk you through selecting components, assembling them step by step, and configuring the necessary software to get your drone in the air. With careful preparation and the right tools, you’ll be flying in no time!
1. Best FPV Drone Store
Before building your own FPV drone, it’s crucial to gather all necessary parts from reliable sources. Several reputable FPV Drone Stores offer a wide selection of components, each with its own pros and cons. Here are some of the best stores to consider:
1.1 MEPSKING
MEPSKING is an online fpv drone store that offers a broad selection of kits and parts from various well-known brands. With competitive pricing, it provides everything from frames and motors to flight controllers and FPV cameras, making it an excellent choice for both beginner and experienced pilots. Whether you’re looking to build a drone from scratch or upgrade components, MEPSKING’s diverse range of products ensures you’ll find what you need at affordable prices.
- Pros: Specializes in high-quality motors, flight controllers, and ESCs. Known for innovation in drone motor technology.
- Cons: Limited variety in certain drone parts like radio controllers or antennas.
1.2 GetFPV
- Pros: Offers a wide selection of FPV gear, from complete drones to individual parts like frames, motors, cameras, and FPV goggles. Provides detailed product descriptions and customer reviews.
- Cons: Some products might be pricier compared to other stores, and international shipping can be costly.
1.3 MyFPVStore
- Pros: Known for budget-friendly parts and frequent discounts. Offers a range of products from beginner to expert-level.
- Cons: Limited availability on high-demand items, slower restock times on popular products.
1.4 RaceDayQuads
- Pros: Known for fast shipping and great customer service, especially within the U.S. It has a vast inventory of FPV components, from motors to batteries, with competitive pricing.
- Cons: International shipping can be expensive and sometimes slower.
1.5 Pyrodrone
- Pros: Offers unique products and custom-designed components that are harder to find elsewhere. Great for FPV racing enthusiasts.
- Cons: Website navigation can be tricky for beginners; some users report occasional stock shortages on popular items.
When building an FPV drone, finding the right store is just as important as the components themselves. These FPV Drone Stores are reliable options to help you get all the parts you need for your build.

2. Essential Parts of an FPV Drone
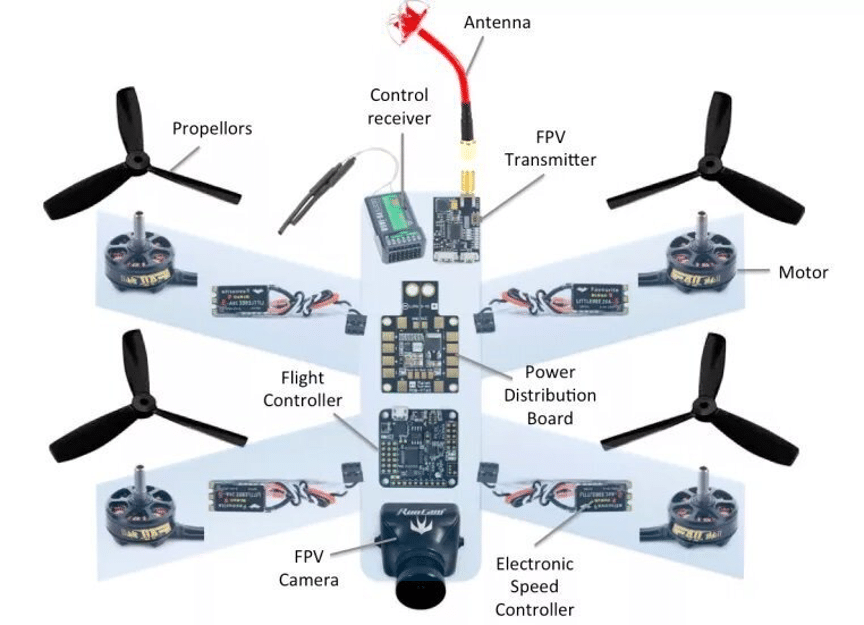
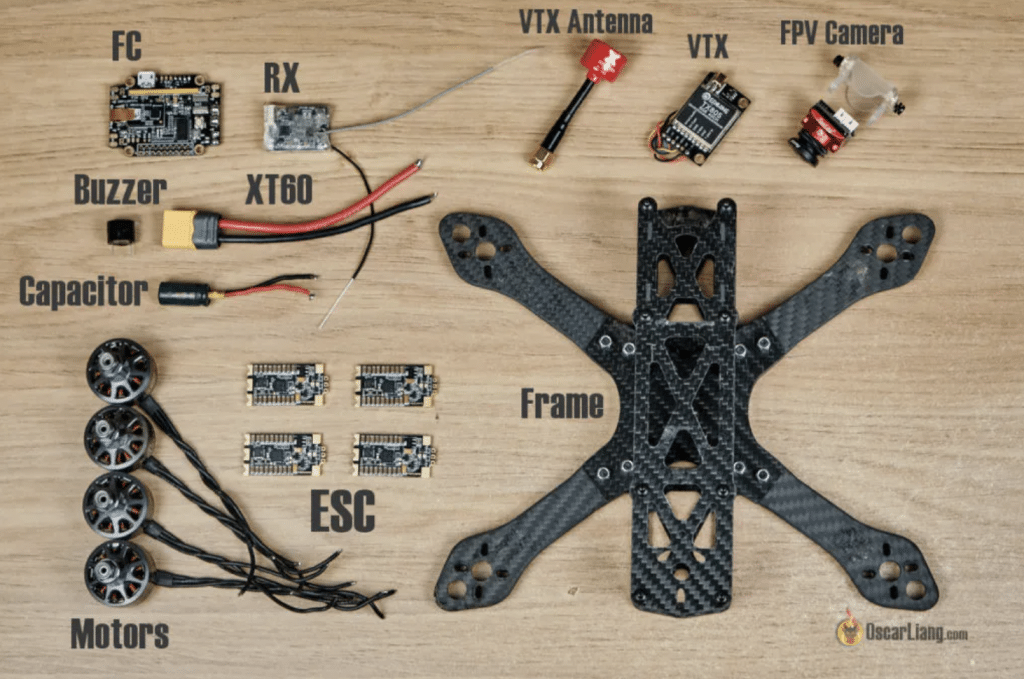
To build a functional FPV drone, you’ll need a few core parts. Each part plays a specific role in the FPV drone’s performance:
- Frame: The structure that holds all parts together. A 5 inch frame is ideal for most FPV setups, offering balance between agility and carrying capacity.
- 4 Motors: One for each arm of the quadcopter, providing lift and thrust. Motor selection depends on the drone’s intended use (racing or freestyle).
- 4 Propellers: These are matched to the motors to create thrust. Propeller size and pitch affect speed and control.
- 4in1 ESC (Electronic Speed Controller): Controls the motors’ speed by regulating power from the battery.
- Flight Controller: The brain of the drone, responsible for stabilizing flight and processing inputs from the remote control.
- LiPo Battery: Powers the entire drone. Different capacities provide varying flight times, and it’s crucial to match the battery voltage to the other parts.
- FPV Video Transmitter (vTx) & Receiver (vRx): Sends real-time video from the FPV camera to the goggles or monitor for live viewing.
- Board Camera: Captures the FPV feed for the pilot.
- Radio Control Transmitter (Tx) & Receiver (Rx): The communication system that allows the pilot to control the drone.
- Antennas: Ensure good signal transmission between the drone and the FPV goggles or controller.
- Battery Straps: Secure the battery to the frame to prevent movement during flight.
- Goggles: Your FPV drone’s visual link is your FPV goggles. Although flying FPV with a ground station and display is possible, it is not as immersive as utilizing goggles. Goggles come in a wide variety of styles, from ready-to-use ones with a ton of features, like DVR capability, to do-it-yourself (DIY) versions that you can build yourself.
3. Additional Items and Tools to Consider
When building and maintaining your FPV drone, these tools and accessories will help:
- Battery Charger: For safely recharging your LiPo batteries.
- Battery Voltage Capacity Checker: To monitor the charge level and avoid over-draining your battery.
- Soldering Iron & Solder: Essential for assembling components and making electrical connections.
- Hex Socket Screwdriver: For tightening the screws that hold parts together.
- Wire Cutter: To trim wires to the correct length.
- Needle Nose Pliers: Useful for handling small parts and wires.
- Landing Skid Pads: Cushion landings to protect your frame.
- Battery Stick Pad: Prevents the battery from slipping off during aggressive maneuvers.
- Spare Parts: Always have extra propellers, motors, and screws on hand for quick repairs after crashes.
4. Step-by-Step Guide to Building Your FPV Drone
Step 1: Assemble the Frame
Begin by assembling the bottom section of the frame, where all components will be mounted. Keep in mind where your motors, flight controller, and other parts will go. Pay attention to the orientation, and don’t overtighten the screws to avoid damaging the frame.
Tip: Use a bit of thread locker on screws to prevent them from loosening mid-flight.
Step 2: Mount the PDB (Power Distribution Board)
The PDB serves as the power hub for your drone. Use nylon or rubber standoffs to secure it, ensuring that it doesn’t make contact with the conductive carbon fiber frame. Solder the battery connector to the PDB before mounting for easier access.
Tip: Always ensure your PDB is elevated from the frame to prevent short circuits.
Step 3: Attach the Motors
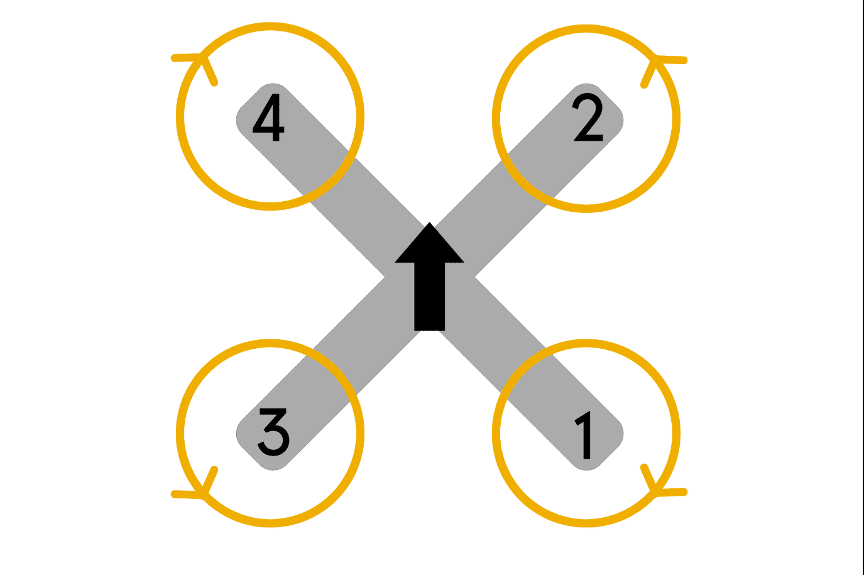
Mount the motors onto the arms of the frame. Make sure to position them according to your motor layout (clockwise/anti-clockwise). Use screws provided, but be cautious of screw length to avoid damaging the motor windings.
Tip: Apply thread locker to keep the screws secure without overtightening.

Step 4: Mount and Connect ESCs
If you have individual ESCs, mount them to the arms near each motor and cover them with heat shrink for protection. For a 4-in-1 ESC, mount it onto the frame using standoffs. Solder the motor wires to the ESCs, leaving a little slack to protect against tension during crashes.
Tip: Use double-sided tape or zip ties to secure ESCs to the arms.
Step 5: Wire ESCs to the PDB
Connect the ESCs’ power wires to the PDB. Red wires go to the positive terminal, and black wires go to the negative. Ensure proper connections to avoid short circuits, as incorrect wiring can cause fires.
Tip: Double-check all connections with a multimeter before applying power.

Step 6: Test Power System
Before proceeding, check for continuity using a multimeter to ensure there are no shorts. Power up the system without the propellers, and listen for beeps from the ESCs to confirm proper connections.
Step 7: Mount FPV Camera and Video Transmitter (VTX)
Mount the FPV camera on the designated frame slot, adjusting the angle based on your preference (usually around 15°for beginners). Secure the VTX near the camera using double-sided tape or zip ties. Ensure the VTX antenna is connected to avoid damage.
Tip: Attach the VTX antenna before powering it on to prevent overheating.
Step 8: Wire the FPV System
Connect the camera and VTX to the PDB for power. Then, wire the camera’s video out to the VTX’s video in. Make sure the voltage matches the requirements of both components (5V or 12V).
Step 9: Test FPV System
Power on the drone and check your FPV goggles or monitor. Make sure you can receive a clear video signal, adjusting the camera focus if necessary.
Step 10: Mount the Receiver
Mount the receiver (Rx) on the frame, ensuring the antennas are positioned well for good signal reception. Power the receiver from the 5V pads on the PDB and bind it to your transmitter (Tx).
Tip: Place antennas in a V-shape for optimal signal.
Step 11: Install the Flight Controller
Mount the flight controller on standoffs above the PDB, ensuring that the USB port is easily accessible. Wire the flight controller to the ESCs, receiver, and other components according to the pinout diagram for your specific board.
Tip: Use rubber standoffs or O-rings to soft-mount the flight controller and reduce vibrations.
Step 12: Final Testing and Configuration
Before mounting the props, test all systems. Ensure motors spin in the correct direction and that the flight controller responds to inputs. Use Betaflight or a similar software to configure the flight controller, set the failsafe, and calibrate the sensors.

Step 13: Final Assembly
Once everything is tested, complete the frame assembly by adding any protective covers, securing wires, and attaching landing skids. Only attach the propellers once you are confident that all systems are functioning properly.
By following these steps, you’ll be on your way to completing a fully functional FPV drone!
5. Software Configuration and Testing for Your FPV Drone
After physically building your FPV drone, the next crucial step is configuring the software and running tests to ensure everything works properly. Here’s a quick guide to help you set things up and avoid common mistakes:
5.1 Software Configuration
Step 1 – Install Software and Drivers: Download and install a configuration tool like Betaflight. Connect your drone via USB, and if needed, install the appropriate drivers for your flight controller.
Step 2 – Firmware Update: Ensure you have the latest firmware for your flight controller. The newest version typically provides improved stability and features. Use the configurator’s firmware flashing tool to update.
Step 3 – Set Up Peripherals: Your drone may have several peripherals connected to UART ports (e.g., receiver, GPS). Assign the correct peripherals to each UART in the configurator to ensure proper communication between components.
Step 4 – Configure Basic Settings:
- Flight Controller Orientation: Set the orientation of your flight controller based on its mounted angle.
- ESC Protocol: Choose the right communication protocol between the flight controller and ESCs (e.g., DShot600, PWM).
- Receiver Settings: Choose the type of receiver (SBUS, IBUS, etc.) and ensure it’s correctly linked.
- Throttle Limits: Set minimum and maximum throttle values to ensure safe motor control.
Step 5 – Set Flight Modes: Assign flight modes like Arm/Disarm, Angle Mode (for beginners), and Acro Mode (for more advanced flying) to specific switches on your transmitter.
5.2 Test the Configuration
Before attaching propellers, run through a series of tests to make sure the drone responds correctly:
- Flight Controller Orientation: Check the 3D model in the configurator to ensure it matches your drone’s physical movements.
- Motor Check: Ensure each motor spins in the correct direction and is controlled by the right channel.
- Receiver and Controls: Verify that the transmitter inputs are reflected correctly in the configurator’s receiver tab.
5.3 Final Safety Tests
- Arming: Test the arming switch and ensure the motors respond to throttle inputs.
- Failsafe: Simulate a signal loss by turning off the transmitter mid-flight (without props attached). Ensure the motors stop within a second.
5.4 First Flight Test
Once you’ve confirmed everything is working, attach the propellers and take your drone for a test hover in a safe, open area. Always double-check that the propellers are mounted in the correct orientation for proper lift.
This guide covers the essential steps to get your FPV drone flying safely, leaving room for further tuning as your skills and confidence grow.
