
What is AWS Glue?

AWS Glue is a Serverless, Event-driven Data Integration Platform that makes it simple to identify, prepare, and unify data for analytics. It operates as a compute-based service that works in response to events. It will auto-execute the code and handle the resources required automatically. Hence, AWS Glue Data Catalog makes it easy for users to find and access data.
What is AWS QuickSight?

AWS QuickSight is a Serverless Business Intelligence (BI) Service that enables you to easily create and publish interactive dashboards, receive answers through natural language queries and share them with any device. You can pay as you go with no upfront costs or annual commitments.
A Serverless Data Lake Architecture can help you generate inuitive insights faster. AWS Serverless Service can help you process and analyze unstructured data with ease. In addition, Serverless Data Lake Architectures also help you deisgn a Cloud-based solution/pipeline for Data Lakes that can process an immense amount of data. You can use the Lambda Architecture to process and fetch data in a batch-wise manner here.
The steps are as follows:
A) Create your Data Ingestion Job
An Automated Data Dumping job is required that will take files from the On-Prem file server’s folder and dump them onto the S3 bucket. This process can be automated by using a Python-Shell Glue job.
Step 1: In the AWS Console, navigate to the CloudShell button and click on it.
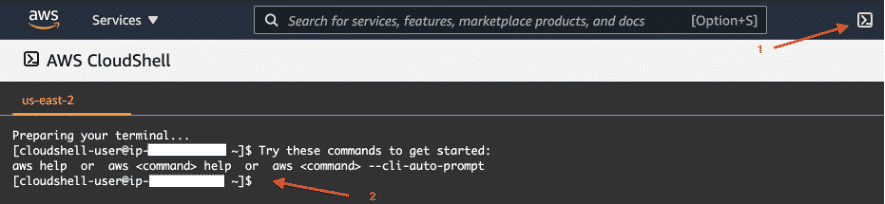
Step 2: CloudShell console will be loaded and the terminal window will be displayed.
Step 3: Enter the following into the terminal window of CloudShell, replacing aws-account-number used in the S3 Bucket name. Follow the convention: sdl-immersion-day-{aws-account-number}. For example: sdl-immersion-day-0123456789112). This command will replicate existing information from a different bucket into your bucket.
aws s3 cp s3://kat-tame-bda-immersion/raw/2019 s3://sdl-immersion-day-{aws-account-number}/raw/2019 –recursive
You will receive several terminal notifications confirming that objects have been successfully copied into your S3 Bucket.
B) Create your PySpark ETL Job
You can now create a PySpark job that takes updated or new files, partitions them depending on a column, and saves them in bucket/year=year>/month=month>/ format in the Parquet format.
- Step 1: Go to AWS Console and create a new PySpark job.
- Step 2: Establish an IAM role with the key permissions. Some of the examples are AmazonS3FullAccess, AWSGlueServiceRole policies.
- Step 3: Choose the “Author a fresh/new custom script” option.
- Step 4: In Type, select “Spark” and in ETL Language, select “Python”.
- Step 5: Enable “Job Bookmarking” in Advanced properties.
- Step 6: The rest of the configurations can be set as default. However, you can upgrade the DPUs capacity to 2x for a low cost.
You can check the output files in the S3 bucket. Data is partitioned by years/months/days or in combination, etc, in the Parquet format as per your requirements.
C) Create Crawler to Auto-Discover S3 Data Schema
A crawler is used to register newly created partitions in the S3 Bucket after the jobs are executed:
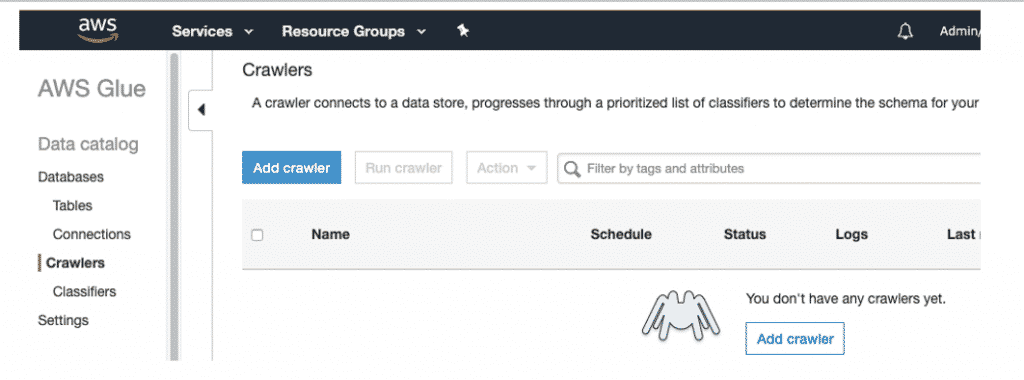
Step 1: Navigate to Crawlers in the AWS Glue Console.
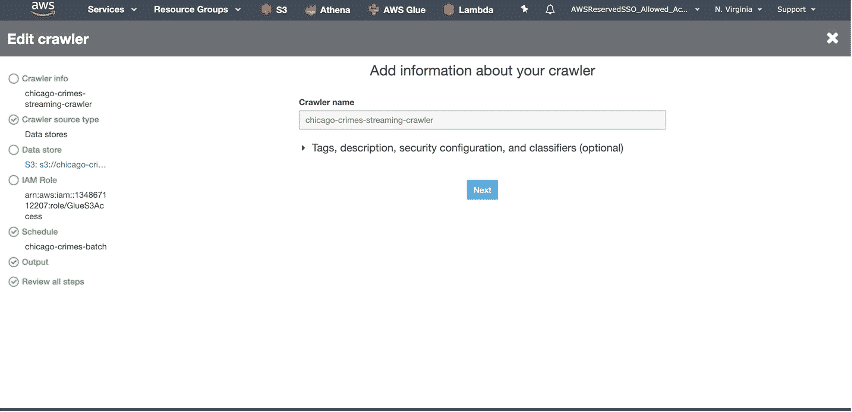
Step 2: Click “Add Crawler” and set your crawler name.
Step 3: Select Crawler source type as“Data stores”.
Step 4: In the Add a datastore screen, add the required credentials.In the Add another data store screen, select “No”.
Step 5: In the Choose an IAM role screen, click “Choose an existing IAM role”, and select the role.
Step 6: Set the schedule frequency for the crawler as “Run on Demand”.
Step 7: On the Configure the crawler’s output screen, click the “Add a database” button, set the Database name, and click “Create” with other default options unchanged.
Step 8: Now, click “Finish”.
Step 9: In the main Crawlers window, select your crawler, and click “Run crawler”.

Step 10: When the crawler’s execution is finished, the “Tables added column” will show a value greater than 0.
D) Organize Glue Jobs and Triggers with Glue Workflows
Workflows eliminate the need to manually set up a flow between various Glue Entities such as Triggers, Crawlers, and Glue Jobs. On the console, you can monitor the status of the various nodes in the workflows, thus making it increasingly easier to monitor progress and troubleshoot issues.
The steps to create a Workflow are as follows:
- Step 1: Go to your AWS Glue Console and select the “workflows” option.
- Step 2: Give a name and description as the unique identity for your workflow. Then, click the “Add” button.
- Step 3: Now, select the workflow and go to the “Graph” tab.
- Step 4: Select the “Add trigger” button.
- Step 5: Select the “Add New” button and give the trigger a name and a description.
- Step 6: Select the Trigger Type as “Schedule”.
- Step 7: Choose a specific time to run your trigger and then click the “Add” button.
- Step 8: You can now include a Node that will be triggered. Then, add your Python-Shell job.
- Step 9: You can now add another trigger node and proceed with your execution flow.
- Step 10: Run the Glue Workflow.
Note: Delete your workflow whenever it’s not required anymore. Otherwise, it’ll be scheduled to run at the time you have set.
E) Visualize Data with AWS QuickSight
The steps to analyze data in the data lake using QuickSight are as follows:
- Step 1: Open the Amazon QuickSight console, enter your credentials and log in to your account.
- Step 2: Configure your Amazon QuickSight account settings to access Athena and your S3 Bucket. First, check the Amazon Athena box. Check the Amazon S3 checkbox to modify/update Amazon QuickSight access to your S3 buckets. Select the buckets you wish to make available, then click the “Select buckets” button.
- Step 3: From the left navigation pane, select the “Datasets” option.
- Step 4: You’ll see a “Create your New Dataset” button. Click on it.
- Step 5: From the list of data sources, select “Athena”.
- Step 6: Now, give your data source a name and click the “Create data source” button.
- Step 7: In the “Choose your table window”, the name of the data source catalog is automatically populated. Select the desired database. And the list of existing tables will be displayed. Select the view/table that you want to consider and click on the “Edit/Preview data” button.
- Step 8: You can re-order, rename, drop, and perform a variety of preparatory tasks on your data before visualizing it.
- Step 9: Then you can choose to use either SPICE (cache) or Direct Query your data.
- Step 10: Now, you can click the “Save & Visualize” button at the top and you will be sent to the “Analysis” window, where you can begin building your dashboard. You can add a new visualization, populate the metrics with your fields, and select the visual type.
Conclusion
This blog explains the steps involved in setting up a Serverless Data Lake Architecture in detail. It also gives a brief overview of the introduction of AWS Glue and Amazon QuickSight.Hevo Data is a fully automated No-code Data Integration platform that can help bring data from 100+ sources (including 40+ free sources) to your desired Destination in near real-time without writing any code. You can integrate with any data source using Hevo’s point & click UI and instantly move data from any data source to Snowflake, Google BigQuery, Amazon Redshift, or Firebolt.