
Hospitals and clinics work hard to add new technologies to their workflow to produce desired outcomes. Integrating new imaging devices like Orthoscan leads to technical difficulties and increased setup times.
Moreover, surgeons and medical staff may find it challenging to adapt to a new imaging system, especially if training is not streamlined. To cater all these issues, we will discuss in detail how you can stream your surgical workflow by successfully integrating Orthoscan.
In this article, you will learn about Orthoscan systems from optimizing setup and staff training to ensuring seamless compatibility with existing systems, each and everything in clear detail.
What makes Orthoscan different from traditional C-arms?
Orthoscan is better than any traditional C-arms due to its compact and lightweight design. The conventional C-arms take up so much space in operating rooms, but Orthoscan mini C-arms are smaller, highly portable, and easier to manage.
This makes them ideal for clinics, orthopedic procedures, and smaller surgical setups where space is limited and flexibility is crucial.
Another major difference is its advanced imaging technology. Old C-arms rely on older image intensifier technology, which produces distorted images.
In contrast, Orthoscan uses flat-panel detectors (FPDs) that deliver sharper, high-resolution images with better clarity. Due to this technology, surgeons get precise, real-time fluoroscopic imaging without compromising on accuracy.
How Orthoscan improve workflow efficiency?
Integration of orthoscan into your procedures can enhance your ability to perform accurate and real-time diagnosis, it also improves the result of patient outcomes. You can see a better visual representation of bones in this procedure.
It can provide detailed information on where the damage can be, or how deep the damage this in a real-time display. That makes this technology a huge success.
Preparing Your Surgical Suite for Orthoscan
Space optimization
Before integrating Orthoscan into the Surgical workflow, make proper space to ensure efficiency and ease of use. Orthoscans are not like other old big C-arms which are large and take up significant room, infact they are specifically designed for limited space.
Hospitals and clinics should position it in a way that allows easy access to the surgical table while ensuring that medical staff can move freely without obstruction.
Power and connectivity setup
Orthoscan does not require any complex wiring and power supplies to run. It is designed to be more energy-efficient and portable. However, proper power management is still essential to ensure uninterrupted performance during surgeries.
Clinics should place power outlets near the surgical area to prevent cord stretching, which can cause accidents or disconnections.
Training staff
You can integrate Orthoscan by keeping every aspect in the right way but what will happen if your staff is not educated to use it? To avoid any accidents, hospital staff including surgeons, radiologists, and technicians must get knowledge about the machine and how it operates.
However, Orthoscan offers a user-friendly touchscreen interface with simple functions, but without proper training, staff may struggle to fully utilize its features.
Integrating Orthoscan into Your Procedures
Orthoscan integration into your surgical workflows enhanced the efficiency in multiple ways. It improves efficiency by providing real-time display during surgery. It allows the surgeon to make critical decisions during operations on the spot, like for instance, dyeing fracture reduction, they can check whether the fracture properly aligns in real-time.
It also helps implantation during joint replacement and ensures the correct position of the fractured bone.
Some hospitals don’t have X-rays or imaging technology, so they have to go to another area where X-rays can be held. However, Orthoscan ensures surgeons perform imaging directly in the operation room.
Key Parts of Orthoscan Mini C-Arm Machine
Orthoscan machines are made up of high-quality parts and each part is crucial to get better imaging.
Thinnest Flat Detector
Orthoscan features an ultra-thin flat detector that can be placed directly on the operation surface while keeping the C-Arm in position. This reduces surgery time and sterility risks.
Over-Rotation
The OrthoScan mini C-Arm offers a 150° orbital rotation, which is enough for a wider view without any manual adjustments. This improved rotation provides better imaging angles while reducing patient discomfort.
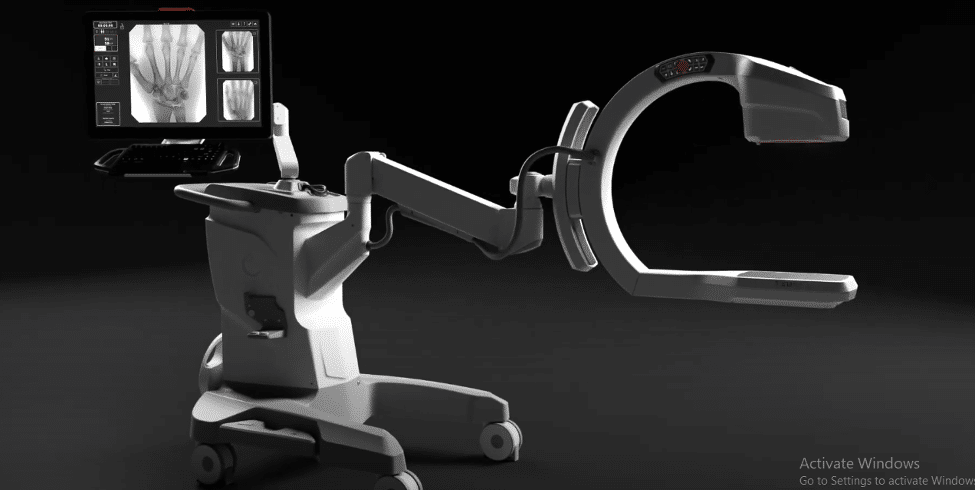
Surgical LED Lights
Surgical Lights are important and remove the shadow from the C-arm. These LED Lights are positioned at the bottom of the tube head
Bilateral Sterile Field Controls
Field controls are applied on both sides of the tube head to make it easy to take images and keep records in a sterile area.
Conclusion
Integrating Orthoscan into a surgical workflow is a first step that every Orthopedic Surgeon should take to enhance their work and deliver better results. This process requires careful planning and execution to ensure seamless operation within your clinical setting. From space optimization to power and connectivity setup, every detail is important to maximize its productivity.
Once you are done with spacing and other technical aspects, train your staff about its uses by organizing detailed sessions. Educate them about the important parts of the machine including touch screen and scan options. This way, by adapting advanced imaging technologies like Orthoscan will help you to revolutionize surgical workflows.